Making a time-lapse on the command line using FFmpeg and ImageMagick
We're vacationing in Whistler, BC right now as "endurance spectators" to my father-in-law's 3rd Ironman triathlon. Expecting some beautiful landscapes and weather, I brought my newly acquired X100T to take some nice photos.
Yesterday, I set it up on an interval timer and pointed it right towards Rainbow Mountain, which faces the patio in the kitchen of the little condo unit we're renting out. After all was said and done, I ended up with 400 images depicting clouds moving over a mountain peak and not much idea of what to do with them. So, as any self-respecting engineer would, I set out to create a time-lapse using only my trusty command-line tools: FFmpeg and ImageMagick.
Let's get down to it.
Note: Everything in this tutorial assumes that you have a current copy of ImageMagick and FFmpeg installed on your machine.
Resizing 
Even though I turned off RAW on the X100T, the images were still pretty huge (4896x3264). During my first tests, making movies from images this large gave really inconsistent results and took a long time to create, with not much extra benefit.
Therefore, the first thing you should probably do is check the size of your images and, if necessary, resize them to be a bit smaller so they will play more nicely with FFmpeg and any other image manipulation that you're going to do.
Since I planned to upload my video to YouTube, I referenced a handy page they have that lists out their preferred resolutions, codecs, and formats for upload (https://support.google.com/youtube/answer/1722171?hl=en). If you're like me, and you don't care too much about maintaining the current aspect ratio, here's what you can do. This will resize your images to a preferred resolution (in this case, 1280x720), and will potentially crop off the sides or top in the process. To start, make sure you're in the directory with all of your photos.
$ for FILE in `ls *.JPG`; do \
  mogrify -resize 1280x720^ -gravity center -crop 1280x720+0+0 +repage -write RESIZED_PHOTO_DIRECTORY/$FILE $FILE; \
done
In detail, this command -resizes photos to a 1280x720^ resolution (the caret means that the smaller of width and height is maintained and the larger one is kept even if the resolution is larger), and then, by using -gravity and centering, we crop the image to 1280x720 exactly, and write to RESIZED_PHOTO_DIRECTORY/$FILE. Phew, that was a mouthful.
If you just want to resize to a certain height/width and want to maintain the original resolution, just do this:
$ for FILE in `ls *.JPG`; do \
    mogrify -resize 600x -write RESIZED_PHOTO_DIRECTORY/$FILE $FILE; \
done
Maintaining Color Distribution 
Note: this step might not be necessary in your situation, but it greatly improved the quality of the final product for me. YMMV.
Sometimes images captured in a time lapse have very different histograms (especially if you have auto-aperture / shutter-speed enabled), and this can make things look "jumpy" from frame to frame. Obviously, this won't look great in your final video, so we're going to normalize the colors to a set distribution.
For an example, just compare the following two images (especially notice the trees, which are much lighter in the first example than the second):
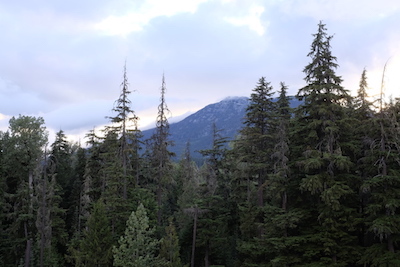
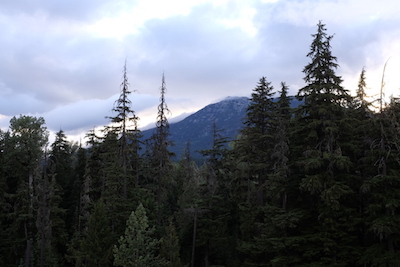
Not ideal, right?
To help achieve this end, I used an ImageMagick script called histmatch, generously provided by Fred Weinhaus (link: http://www.fmwconcepts.com/imagemagick/histmatch/index.php or backup). The idea to use a reference image to generate a histogram that we want all of the other images to match. Once you've decided on your reference image, run the following on every image except the reference image (otherwise the universe will explode).
histmatch -c gray REFERENCE.JPG TARGET_IMAGE.JPG NORMALIZED_IMAGE_DIRECTORY/FILE.JPG
(I just piped the output of ls *.JPG into a file called normalize.sh and used some of my Vim-fu to do this. Your process might be different.)
12/27/2017 Update:
Re-reading this post, I've found it's much easier to just move the target image to the normalized directory, and then run this using find/exec.
find . -depth 1 -name "*.JPG" -exec histmatch -c gray normalized/TARGET_IMAGE.JPG {} normalized/{} \;
Finally, make the darned movie 
This is the fun part. Just send the files through to FFmpeg and have it do its magic. If filenames are incrementally named, you'll want to provide the parameters below (like -start_number and the _DSF%04d.JPG format) to make things match up.
ffmpeg -start_number 1 -i _DSF%04d.JPG -c:v libx264 -pix_fmt yuv420p timelapse.mp4
This tells FFmpeg to take all of the JPEGs in the directory starting with _DSF and ending with 4 digits, and to output an h.264 video with the yuv420p colorspace to video.mp4. You now have a beautiful timelapse!
If you're interested in the final product, you can check it out on YouTube. Enjoy!