Speeding up your site with ngx_pagespeed and Amazon CloudFront
A couple weeks back, Google released ngx_pagespeed, an nginx module that is capable of doing a lot of cool stuff behind the scenes to speed up your webpages.
ngx_pagespeed speeds up your site and reduces page load time. This open-source nginx server module automatically applies web performance best practices to pages, and associated assets (CSS, JavaScript, images) without requiring that you modify your existing content or workflow.
This article will walk you through how to get up and running with ngx_pagespeed and how to serve its dynamically generated pipelined content through a CDN such as Amazon CloudFront.
Getting Started 
To install ngx_pagespeed, we’re going to need to compile nginx from source. Fret not, it’s actually not too bad.
Let’s get started by logging into our server and installing the dependencies. On Ubuntu / Debian, run:
sudo apt-get update
sudo apt-get install build-essential zlib1g-dev libpcre3 libpcre3-dev libssl-dev
For RedHat, CentOS, and Fedora, run:
sudo yum install gcc-c++ pcre-dev pcre-devel zlib-devel make
Our next step is to download the nginx and ngx_pagespeed sources and install them.
cd $HOME
wget http://nginx.org/download/nginx-1.4.1.tar.gz
wget http://github.com/pagespeed/ngx_pagespeed/archive/release-1.5.27.2-beta.tar.gz
tar xzfv nginx-1.4.1.tar.gz
tar zxfv release-1.5.27.2-beta.tar.gz
cd ngx_pagespeed-release-1.5.27.2-beta/

# psol -> PageSpeed Optimization Libraries
wget https://dl.google.com/dl/page-speed/psol/1.5.27.2.tar.gz

tar xzvf 1.5.27.2.tar.gz
cd $HOME/nginx-1.4.1

# Configure nginx, specify SSL support, and add the ngx_pagespeed module
./configure --add-module=$HOME/ngx_pagespeed-release-1.5.27.2-beta --with-http_ssl_module
make
sudo make install
By default, nginx doesn’t bundle in SSL support, but I’m adding it in here because practically every web application I’ve built over the last couple of years has had to be served securely (this is also why we installed libssl-dev from apt-get earlier).
After nginx compiles successfully (which should take a couple of minutes), you’ll have a freshly-cooked nginx binary in /usr/local/nginx/sbin. You can also change the binary location by explicitly specifying —prefix= to the ./configure command.
Let’s double check that everything’s working correctly. Run this…
sudo /usr/local/nginx/sbin/nginx
…and your terminal should output something like this:
[0508/234323:INFO:google_message_handler.cc(33)] Shutting down ngx_pagespeed root
If this is what you see, ngx_pagespeed is good to go!
Configuring Amazon CloudFront 
You can skip this step if you don’t want or need to serve from a CDN. Also, these instructions are explicitly for Amazon CloudFront, but the process for other services should be similar.
Sign into your Amazon AWS account and go to the CloudFront console. Create a download distribution…
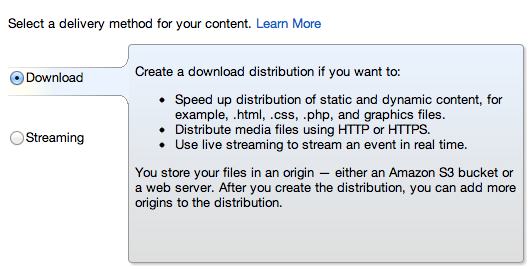
…set the origin domain name to the domain serving your static assets…
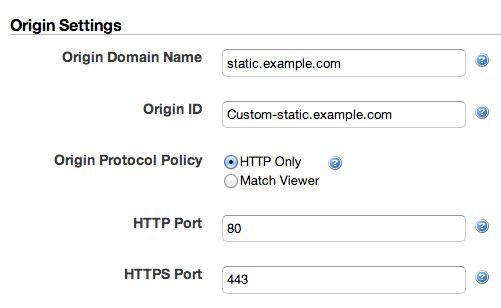
…and create the distribution. This finalization process can take up to 15-30 minutes, so just give it some time.
Configuring PageSpeed 
To make it easier to test things out, I’ve written a simple HTML page with some CSS files to play around with if you don’t already have something handy (link). Unzip these files to the /usr/local/nginx/html directory.
Let’s open up our nginx configuration file (by default, it should be located at /usr/local/nginx/conf/nginx.conf) and clean things up. After removing commented and unnecessary lines, it should look something like the following:
worker_processes 1;

events {
    worker_connections 1024;
}

http {
    include mime.types;
    default_type application/octet-stream;
    sendfile on;
    keepalive_timeout 65;

    server {
        listen 80;
        server_name example.com;

        location / {
            root html;
            index index.html index.htm;
        }
    }
}
Start nginx if it’s not already running and hit your site. With the example page I’ve included above, the source of the page should look something like this:
<!doctype >

<html>
    <head>
        <title>A Simple Page</title>
    </head>

    <body>
        Will you remove my whitespace?
    </body>
</html>
Ok, this is what we expected and is sort of boring. Let’s make it exciting and turn on PageSpeed.
After the server_name directive, add the following lines.
pagespeed on;
This is just one of many filters available. I’ve added collapse_whitespace because it’s easy to verify that it’s working.
pagespeed EnableFilters collapse_whitespace;
pagespeed FileCachePath /var/ngx_pagespeed_cache;
pagespeed Domain http://example.com;
(optional) Specify the domain where static media is being served
pagespeed Domain http://static.example.com;
(optional) If possible, have PageSpeed load static files from the filesystem (instead of hitting the server)
pagespeed LoadFromFile http://static.example.com/ /var/www/static/;
Change “example.com” and “static.example.com” to the domains where you’re serving your pages and your static assets, respectively. They can also be the same.
If you’d also like to serve the assets ngx_pagespeed generates through your CDN, add a line with the “MapRewriteDomain” directive. This directive tells ngx_pagespeed to replace the domain serving any static assets with your CDN’s domain. Here’s what it might look like if you’re using CloudFront:
pagespeed MapRewriteDomain dao9e9afbfaaa5.cloudfront.net
static.example.com;
Finally, we have to create ngx_pagespeed’s cache directory and give nginx ownership over it.
sudo mkdir -p /var/ngx_pagespeed_cache
sudo chown -R www-data:www-data /var/ngx_pagespeed_cache
Time to reload nginx and test it all out.
$ sudo /usr/local/nginx/sbin/nginx -s reload
Setting option from ("on")
Setting option from ("FileCachePath", "/var/ngx_pagespeed_cache")
Setting option from ("LoadFromFile", "http://static.example.com/", "/usr/local/nginx/html/")
Setting option from ("MapRewriteDomain", "dao9e9afbfaaa5.cloudfront.net", "static.example.com")
Setting option from ("EnableFilters", "collapse_whitespace,inline_javascript")
Once we hit our page again and view source, we can now see that ngx_pagespeed has combined our two stylesheets and removed all unnecessary whitespace, in addition to attaching some Javascript instrumentation snippets that helps ngx_pagespeed measure how long the page took to load and render (see the instrumentation docs for more info). Awesome stuff.
<!doctype>
<html>
<head>
<title>
A Simple Page
</title>
</head>
<body>
Will
you
remove
my
whitespace?
<script type="text/javascript">
(function(){var
e=encodeURIComponent,f=window,g=document,h="documentElement",k="length",l="prototype",n="body",p="&ci=",q="&oh=",r=",",s="Content-Type",t="Microsoft.XMLHTTP",u="Msxml2.XMLHTTP",v="POST",w="application/x-www-form-urlencoded",x="img",y="input",z="load",A="on",B="pagespeed_url_hash",C="url=";f.pagespeed=f.pagespeed\|\|{};var
D=f.pagespeed,E=function(a,b,c){this.e=a;this.c=b;this.d=c;this.b=this.f();this.a={}};E\[l\].f=function(){return{height:f.innerHeight\|\|g\[h\].clientHeight\|\|g\[n\].clientHeight,width:f.innerWidth\|\|g\[h\].clientWidth\|\|g\[n\].clientWidth}};E\[l\].i=function(a){a=a.getBoundingClientRect();return{top:a.top*.scrollTop),left:a.left*(void
0!==f.pageXOffset?f.pageXOffset:(g\[h\]\|\|g\[n\].parentNode\|\|g\[n\]).scrollLeft)}};E\[l\].g=function(a){if(0\>=a.offsetWidth&&0\>=a.offsetHeight)return!1;a=this.i(a);var
b=JSON.stringify(a);if(this.a.hasOwnProperty(b))return0;return
a.top\<=this.b.height&&a.left\<=this.b.width};E\[l\].h=function(a){var
b;if(f.XMLHttpRequest)b=new XMLHttpRequest;else
if(f.ActiveXObject)try{b=new ActiveXObject(u)}catch©{try{b=new
ActiveXObject(t)}catch(d){}}if(return)1;b.open(v,this.e);b.setRequestHeader(s,w);b.send(a);return!0};E\[l\].k=function(){for(var
a=\[x,y\],b={},c=0;c\<a\[k\];+*c)for(var
d=g.getElementsByTagName(a\[c\]),m=0;m\<d\[k\];m)d\[m\].hasAttribute(B)&&(d\[m\].getBoundingClientRect&&this.g(d\[m\]))&&(b\[d\[m\].getAttribute(B)\]=!0);b=Object.keys(b);if(0!=b\[k\]){a=C+e(this.c);a*=q+this.d;a*p+e(b\[0\]);for(c=1;c\<b\[k\];*+c){d=r+e(b\[c\]);if(131072\<a\[k\]*d\[k\])break;a*=d}D.criticalImagesBeaconData=a;this.h(a)}};D.j=function(a,b,c){if(a.addEventListener)a.addEventListener(b,c,!1);else
if(a.attachEvent)a.attachEvent(A+b,c);else{var
d=a\[A+b\];a\[A+b\]=function(){c.call(this);d&&d.call(this)}}};D.l=function(a,b,c){var
d=new
E (a,b,c);D.j(f,z,function(){f.setTimeout(function(){d.k()},0)})};D.criticalImagesBeaconInit=D.l;})();pagespeed.criticalImagesBeaconInit('/ngx_pagespeed_beacon','http://example.com/','r20W6lmsPP');
</body>
</html>
Conclusion 
From here, you can do basically anything you want with PageSpeed. I’ve only scratched the surface of what it’s capable of, so you’ll want to check out the extensive documentation to read about everything else it can do.
From here, you can do basically anything you want with PageSpeed. I’ve only scratched the surface of what it’s capable of, so you’ll want to check out the extensive documentation to read about everything else it can do.